MENS T-SHIRTS
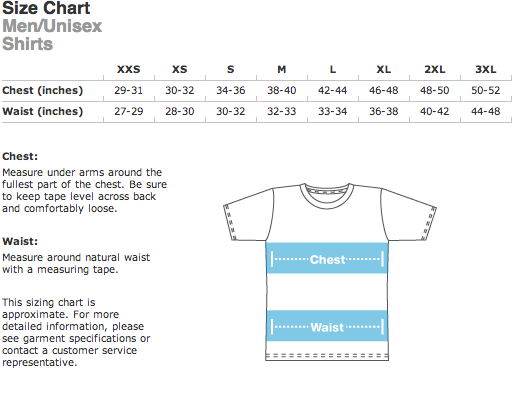
MENS BASEBALL SHIRTS
MENS LIGHTWEIGHT PULLOVER HOODIES
UNISEX CREWNECK SWEATSHIRTS
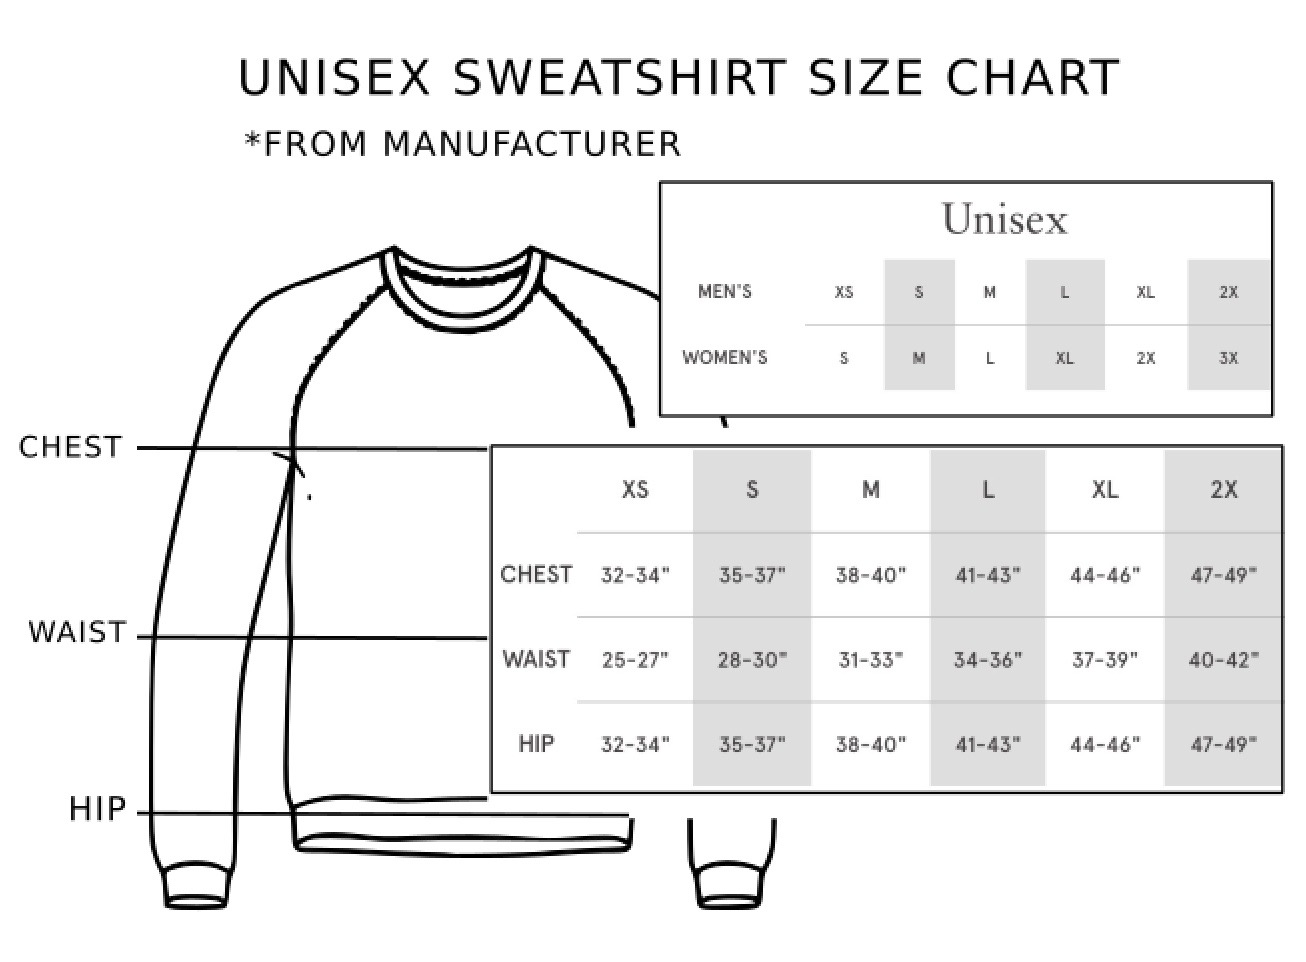
WOMENS T-SHIRTS
The women's version of our Tri-Blend Track Shirt; enjoy everything you love about the fit, feel and durability of a vintage T-shirt, in a brand new version. Womens tri-blended T-Shirt, has a slightly scooped neckline. Ultra-comfy, feels like you've owned it for years the moment you put it on, and for years to come. Runs small. Each garment is hand printed, some slight variations and imperfections may exist. Each one is perfectly imperfect. We use non-toxic water based inks. Prints may fade slightly over time/washings. * Tri-Blend (50% Polyester / 25% Cotton / 25% Rayon) construction * Tri-Oatmeal (50% Polyester / 37% Ring-Spun Combed Cotton / 13% Rayon) * Polyester retains shape and elasticity; Cotton lends both comfort and durability; addition of Rayon makes for a unique texture and drapes against the body for a slimming look * Durable rib neckband * Form-fitting * Will shrink slightly when dried in a dryer.
WOMENS TANK TOPS
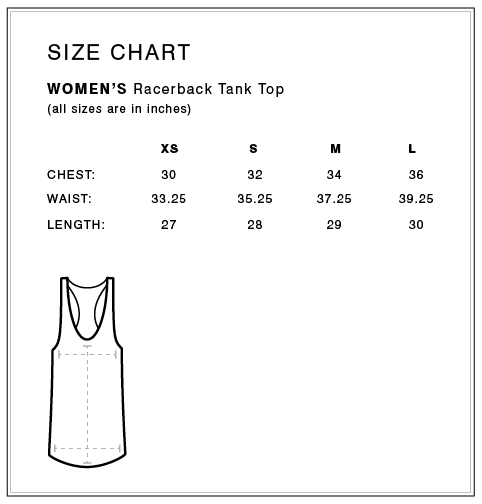
WOMENS LIGHTWEIGHT PULLOVER HOODIES
A soft, lightweight hoodie made from our Eco Jersey to be easily thrown over any outfit. This is t-shirt material, not a heavy sweatshirt. Eco Jersey 50% Polyester, 38% Cotton, 12% Rayon Kangaroo Pocket Drawstring Hoodie Runs small.
BABY AND TODDLER T-SHIRTS
Made from super-soft light weight material. They are screen-printed with original graphics. Unlike other tri-blended t-shirts on the market, ours is made with combed cotton, giving it an ultra-soft feel and superior drape. Super soft and the most comfortable T-shirt they will ever wear. We use non-toxic water based inks. Prints may fade slightly over time/washings. Unisex. Tri-Blend (50% Polyester / 25% Cotton / 25% Rayon) construction. Polyester retains shape and elasticity; Cotton lends both comfort and durability; addition of Rayon makes for a unique texture and drapes softly against the body for a comfortable fit and feel. Durable rib neckband. Shrinks slightly when dried in a dryer.
BABY BASEBALL SHIRTS
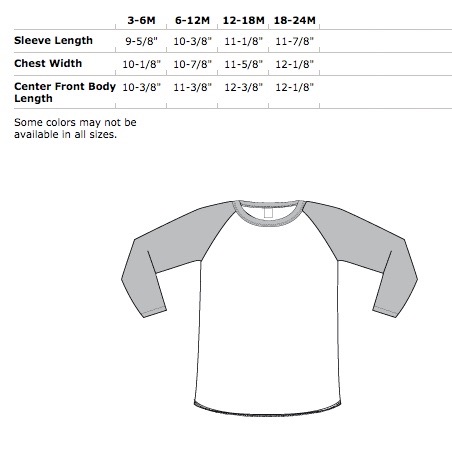
TODDLER BASEBALL SHIRTS
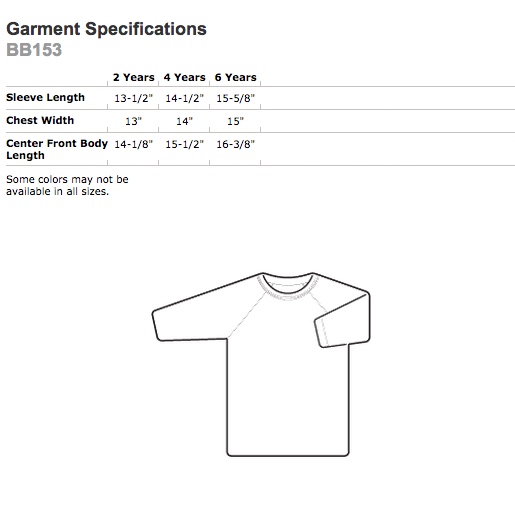
BABY AND TODDLER LIGHTWEIGHT PULLOVER SHIRTS
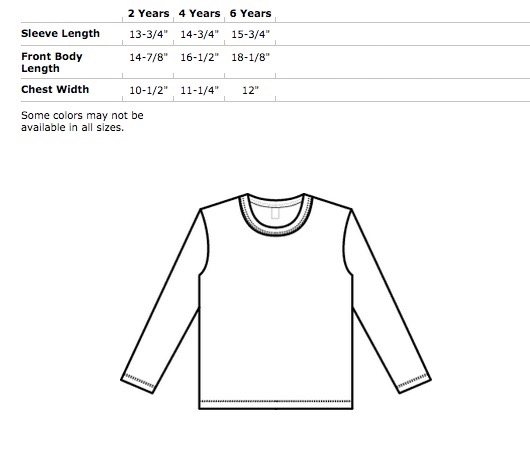
TODDLER ZIP HOODIES
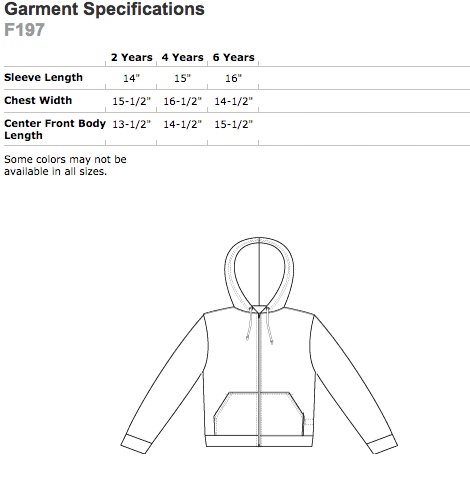
BABY ONESIES

PATCHES
APPLICATION INSTRUCTIONS: Do's and Don'ts for Iron On's ALL manufacturers recommend sewing on all iron on patches and appliques for permanency. Unless your application requires frequent hot water washing and drying, almost all iron on patches can be safely washed and dried. Just apply a bit of common sense. The amount of heat that applied a patch will loosen a patch. Generally patches will survive the amount of heat your fiber can take (exceptions are vinyl, sequin, and "puffy" patches - see below for more details).
Here's a list of general do's and don'ts: DO NOT APPLY iron on patches to waterproof rainwear, highly elasticized fabrics, leather, rayon, nylon or similar fabrics. If unsure, test your fabric with an iron on a hidden seam or hem to see just how much heat the fabric will accept without damage. Cotton and polyester fiber blends work best. As new fibers are constantly being developed, be sure to test!
1. Set iron to "dry" not steam setting.
2. Pre-heat to cotton setting (or if unsure of your fabric, one or two settings lower).
3. Position your patch as desired and cover with the pressing cloth.
4. Place the backing underneath between your garment or project and the iron board. The backing board helps reflect heat back to the patch and garment rather than drawing heat into the ironing board cover speeding up the process and ensuring a flat, secure bond.
5. From the front of the patch, press the iron flat in an up and down, vertical motion (do not move back/forth/around) for 25 to 40 seconds to tack the patch in place using the center part of your iron.
6. Turn inside out or upside down (if possible) and still using the pressing cloth, repeat from reverse side for 30 to 45 seconds.
7. ALLOW the patch and your item to cool, completely.
8. Test an edge of the patch with your fingernail to ensure it is secure.
9. If not, repeat increasing the amount of time 10% - 20% each time taking care to ensure the patch and fabric are protected. Warning: Do not remove the patch if you fail on your first attempt or you will damage the adhesive. Just repeat the steps with additional time. Some household irons just don't get hot enough as they do not have temperature gauges. The goal is to melt the glue into the fiber without scorching or burning the fabric or the patch.

